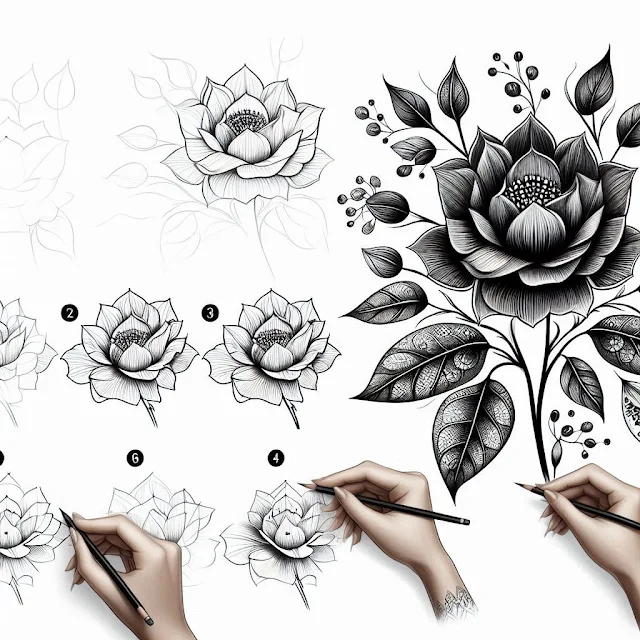
How to Draw a Flower: A Comprehensive Guide
How to Draw a Flower: A Comprehensive Guide
Drawing flowers is a delightful and rewarding hobby that can enhance your artistic skills and provide a relaxing pastime. Whether you're a beginner or an experienced artist, learning to draw flowers involves understanding the basic structure, using the right techniques, and practicing regularly. In this guide, we will walk you through the process of drawing a flower step-by-step, ensuring that you capture the beauty and intricacy of these natural wonders. Follow these steps, and you'll soon be creating stunning floral illustrations.
Step-by-Step Guide to Drawing a Flower
Step 1: Gather Your Materials
Before you start drawing, ensure you have the necessary materials. Here's what you'll need:
- Paper: Choose a smooth, high-quality drawing paper.
- Pencils: Use a range of pencils (H for light lines, B for dark lines).
- Eraser: A kneaded eraser works best for delicate areas.
- Sharpener: Keep your pencils sharp for finer details.
- Blending tools: Use blending stumps or tissue for shading.
Step 2: Choose Your Flower
Select the type of flower you want to draw. Popular choices include:
- Roses: Known for their layered petals and romantic appeal.
- Sunflowers: Characterized by their large size and vibrant petals.
- Daisies: Simple and cheerful with a round center and long petals.
- Tulips: Elegant with smooth, elongated petals.
Step 3: Study the Flower's Structure
Understanding the basic structure of your chosen flower is crucial. Study photos or real flowers to observe:
- Petals: Note the shape, size, and arrangement.
- Stem: Look at the thickness and texture.
- Leaves: Observe their placement and venation.
- Center: Pay attention to details like seeds or stamens.
Step 4: Sketch the Basic Shape
Begin with a light sketch to outline the flower's basic shape. Use simple geometric shapes to form the structure.
- Draw a Circle for the Center: Start by drawing a circle where the flower's center will be.
- Add Petal Guidelines: Draw light lines radiating from the center to guide petal placement.
- Outline the Petals: Sketch the general shape of each petal, ensuring they vary slightly in size and direction for a natural look.
Step 5: Refine the Petal Shapes
- Detail the Petals: Refine each petal, adding slight curves and variations to mimic their natural appearance.
- Define Overlaps: Show where petals overlap, adding depth and realism.
- Erase Guidelines: Gently erase unnecessary guidelines, leaving only the refined shapes.
Step 6: Draw the Stem and Leaves
- Sketch the Stem: Draw a straight or slightly curved line from the base of the flower to represent the stem.
- Add Leaves: Attach leaves to the stem, noting their shape and angle. Draw the central vein and secondary veins for detail.
Step 7: Add Details to the Flower Center
- Detail the Center: Depending on the flower, add seeds, stamens, or other intricate details to the center.
- Texture and Shadows: Lightly shade the center to give it texture and depth.
Step 8: Shade the Petals
- Light Source: Determine the light source to know where shadows fall.
- Shade Gradually: Start with light shading, gradually building up darker areas to create depth and dimension.
- Blend Smoothly: Use blending tools to smooth out shading, giving the petals a soft appearance.
Step 9: Finalize the Stem and Leaves
- Texture the Stem: Add slight shading and texture to the stem to show its cylindrical form.
- Shade the Leaves: Shade the leaves, considering the light source. Blend the shading to create a smooth transition.
Step 10: Add Finishing Touches
- Refine Details: Go over the entire drawing, refining details and enhancing shadows.
- Highlight: Add highlights where the light hits the petals and leaves to make them pop.
- Review: Step back and review your drawing, making any final adjustments.
Step 11: Practice Regularly
Drawing flowers is a skill that improves with practice. Try drawing different types of flowers and experiment with various techniques to develop your unique style.
Tips for Drawing Flowers
- Use References: Always work with references, whether photos or real flowers, to capture accurate details.
- Experiment with Styles: Try different drawing styles, such as realism, impressionism, or abstract, to find what suits you best.
- Focus on Proportions: Pay attention to the proportions of petals, leaves, and the stem to ensure a balanced drawing.
- Practice Shading: Mastering shading techniques will significantly enhance the realism of your drawings.
- Be Patient: Drawing flowers can be intricate. Take your time and enjoy the process.
Common Mistakes to Avoid
- Ignoring Light Source: Always determine the light source before shading to create consistent shadows.
- Overworking the Drawing: Avoid excessive erasing and redrawing, which can damage the paper and make the drawing look messy.
- Lack of Detail: Pay attention to small details, as they can make a significant difference in the final result.
- Stiff Petals: Ensure petals have natural curves and variations to avoid a stiff, unnatural look.
Advanced Techniques
- Colored Pencils: Experiment with colored pencils to bring your flower drawings to life with vibrant colors.
- Watercolors: Use watercolors for a soft, delicate effect.
- Digital Drawing: Try digital drawing tools and software for precise and editable flower illustrations.
Resources for Further Learning
- Books: Invest in drawing books specifically focused on flowers and botanical illustrations.
- Online Courses: Enroll in online courses or watch tutorials on platforms like YouTube and Skillshare.
- Art Communities: Join art communities and forums to share your work and get feedback from fellow artists.
Drawing flowers is not only a beautiful art form but also a therapeutic activity that can enhance your observation skills and creativity. With patience and practice, you can master the art of drawing flowers and create stunning works of art that capture the beauty of nature.


%20A%20Comprehensive%20Guide.jfif)